Having professional brand photos makes your marketing and web design projects so much easier.
But here is the thing: just doing one outfit, one headshot, and one background photoshoot is different from what I am talking about. I mean doing a whole branded lifestyle photoshoot. You can read this blog post if you need to learn the difference.
But when you decide to go for it with a branded lifestyle photo shoot entirely, there are still MUST HAVES you need for it to truly work so that your images seem like they effortlessly fit into your marketing and that you have enough variety to work with to not only last you awhile but also be able to use across all mediums.
Here are my brand photo shoot must haves for your marketing and web design projects:
#1 – Find a photographer that matches your brand vibe:
The first step in setting up a brand photo shoot is to find a photographer. But ultimately, you shouldn’t just pick anyone. I highly recommend that you find one who can take photos both indoors and outdoors. Some are only great in natural light outside, so ensure your photographer knows how to shoot indoors.
Then, make sure their style of photography matches your brand vibe. My brand is supposed to be friendly, bright, and professional, so I went with a light and airy photographer. If your brand is more moody, find a moody photographer. If your brand is more boho, maybe you want a photographer that has a style with more tans and brown undertones. Ensuring that your photographer’s style matches your branding will allow your photos to seem like a natural extension of your brand vs. in competition with it.
#2 – Horizontal AND Vertical Photos:
It is wild to me that when I see a client’s professionally shot photos, most of the time, they only come back with vertical pictures or maybe just one or two horizontal ones. This is SO frustrating as a designer. It would help if you had a large mix of both because the graphics you will design across social media, your website, free resources, and more will need both. If you want a website that has beautiful branded images in the background, you better request a lot of horizontal images. Vertical ones will NOT work for backgrounds because they look stretched and pixelated on a tablet or computer. But for side-by-side text on a website, you need vertical photos for larger sections so that the text and image look proportional. So again, having a mix of both vertical & horizontal is crucial, and you will thank me later if you ensure you have them during your photoshoot and beyond. Here are examples of what I mean by background images and side-by-side with text on a website. First up, the veritcal side-by-side:


#3 – Horizontal Images Where You are NOT in the Center:
When a client brings me horizontal images of themselves, I am thrilled, but when I see that every single one they are smack dab in the center, I am deflated again. This is because, again, you sometimes want to be able to put text on your photos, and if you are in the middle and take up most of the picture, it makes it hard for that graphic / text to look good, or you will just be covering yourself up.
See the horizontal image example above, where I am off to the right side, with clear dead space to my left. This makes it easy to incorporate text and still be clearly shown professionally. You can’t do this in a vertical photo, and you can’t do it this nicely in a horizontal image when you are in the center. So, request that your photographer take some pictures of you off-center.
#4 – Up Close & Far Away Photos:
No matter if the images are vertical or horizontal, it is best if you have a solid mix of close and far-away shots. You will want some that have more headshot feel and others that are better as design accents that have breathing room or dead space in them, especially in horizontal images. Just like in item #3 above, if all of your horizontal photos are up close and your body takes up 80%+ of the image, you again won’t be easily able to overlay text on it without covering yourself too much. Or when you put it in the background of a website section, only part of you will be seen, and you will feel like you look cut off.
So ask your photographer to take photos up close and zoomed out so you not only have a nice variety of images to look at but you have a great variety to work with in designs. If you default to one or the other, go with more zoomed-out because later on, you can easily crop it down, but adding more space to an image is nearly impossible for someone who isn’t a photo editor. Here is an example of an excellent vertical shot that has ample space:

#5 – Pictures that Show All Aspects of Your Life:
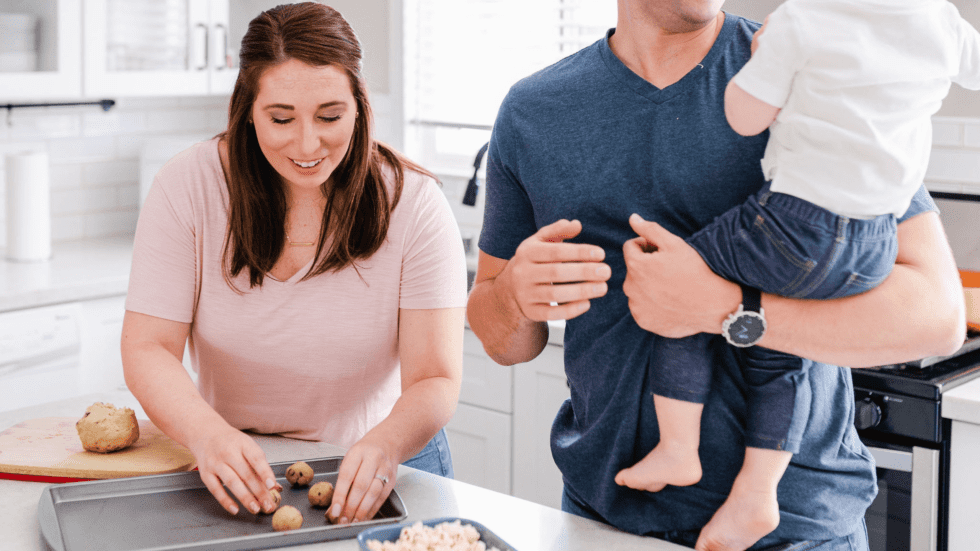
When planning your photo shoot, I highly recommend you brainstorm what working in your business looks like and what your life looks like as a whole and get it captured by the photographer. For instance, if you are a personal trainer but have no images of you working out, your professional headshot in business clothes isn’t going to convey that you like to be in the gym every day with clients. So think about how you like to work, what items you work with, what spaces you work in, and then figure out how to recreate that in a photoshoot.
Remember to also think about your daily personal life and hobbies outside of work so that you can work them into your photoshoot, too. This will give you SO much content to work with for not only your website but also your social media. Since you should post daily on your feeds, you will need that much content anyway! Here are some examples of my personal life that we captured in different photoshoots:


#6 – A Variety of Clothes & Props that Match Your Brand Colors
No matter how many outfits or props you choose for your brand photo shoot, make sure whatever you choose has your brand colors! I can’t stress this enough. Nothing is worse than getting a professionally designed website with your branding, and then your brand photos clash because your clothes are NOT on brand. For example, you will see that in all of my photos, I am wearing blues, pinks, and neutrals (whites, tans). This is because those are my brand colors, and they will match the entire website design and marketing. If you don’t know your brand colors, work with a designer first! You can book a free consult with me to help you out with that!
To help with hitting point #5 above, you will notice I have a variety of clothes regarding different levels of professionalism. I have images that range from where I am wearing a full suit to just leggings and a sweatshirt. Ultimately, the latter is more what I look like when I am working from home every day, but since I am running a business, I wanted to show I am professional as well. But every single piece of clothing matches my brand colors.
If you incorporate props (which you should), those should be as close to your brand colors as possible. So they look just as intentional and professional as your clothes. Plus, you should get images that are just of your props for great filler photos, background photos & more! See some examples of on-brand prop images below:


#7 – Sitting & Standing Images
This is self-explanatory: just like you need various images of you working in your business or daily life, you will want some of you sitting and standing. For some photos, you will want to be behind something, like I am behind the kitchen counter in earlier photos above or sitting behind a desk. You will also want somewhere you are front and center with nothing covering you.
Standing photos with nothing in front of you and plenty of dead space around you also make it easy to “cut yourself out” of the image to create graphics that look like you are popping out. If all of your photos are too up close and your body touches multiple sides of the edge of the image when you remove the background to cut yourself out, you will look half cut-off. So ensure you get photos like the ones below for quick and easy cutout effect.

#8 – A Variety of Backgrounds:
Choosing to have multiple backgrounds for your photoshoot is excellent because you can make it look like you took the photos over many different days (especially with lots of outfits) but knock it out all in one day. Choose backgrounds that have hints of your brand colors and feel aligned with your brand style so that, again, they match your branding and feel cohesive.
If your branding is light and airy with soft colors or pastels, I would not opt for a dark wood backdrop or red brick wall. Having that much color in the background that does not match your brand will overpower the photo and throw off the whole vibe, even if you nail all the other points above. The same can be said about trees and greenery. If your company is not a natural green brand, I wouldn’t opt for you standing in a forest or in front of a tree with a lot of green as your backdrop. It will overpower the look of the images, too. So, thinking about the space you are shooting in is as important as the clothes and props you use.
#9 – Hair & Makeup that Make You Feel Good:
Do you have to get glam for your photoshoot? Only if you want to. All the photos above were shot over three shoots in three different months. I only had my hair and makeup professionally done for one of the days. Doing a good amount of makeup is excellent so that you don’t look washed out in the photographer’s lighting, but it doesn’t mean you have to get it professionally done. Do your hair and makeup the way that feels good to you. You want your photos to really feel like you, so if full glam is not your vibe, then don’t do it on your photoshoot day. If you aren’t confident in your makeup skills, hire an artist and ask for a natural look. They can totally do that, too!
#10 – Invest in This Process:
Now, I have called out a lot in this blog post about what you should do to have an effective brand photoshoot. It will not be cheap unless you have a friend who is a professional photographer who is willing to hook you up.
For my brand photos & photoshoots, I have spent between $4,000, half of that going to the photographer. That total price covered working with the photographer three times, all of the images I got from the shoots (200 – 300), buying props, buying clothes and accessories that were on brand, paying the rental fees for where we shot (her studio & an Airbnb), and hair and makeup artists services & supplies. But you know what, I HAVE USED THESE PHOTOS EVERY SINGLE DAY FOR TWO YEARS! They live all over my website and landing pages; they are on every single piece of marketing I use, and they are on social media posts multiple times a week. This investment was worth it, and I will have them forever.
Now, you can scale back. I went all in because I know the value it can bring, and I also did it to be a positive example of what my clients can do with their brand photos on their marketing and website. For you, maybe you choose to wear clothes that are as close to your brand colors as possible vs. buying a bunch of new items—the same thing with props. Overall, save up where you can for a photo shoot and keep the guidelines in mind, and you will end up with a great product that you can use repeatedly.
In conclusion:
A brand lifestyle photo shoot is an investment that, if done right, can make creating beautiful and cohesive marketing/website so simple for you! Plus, the level of professionalism your marketing presence will bring will be unmatched by your competitors if you keep everything I outlined in this post in mind. The moral of the story is the more variety you have in photo orientation, scale, wardrobe, props, backgrounds, etc., the more you will get to utilize long-term and have flexibility when creating your marketing without feeling like your content is stale or repetitive. Plus, the more intention you have when selecting the colors and vibe of everything in your photos, the more concrete of a brand aesthetic you will create for yourself!